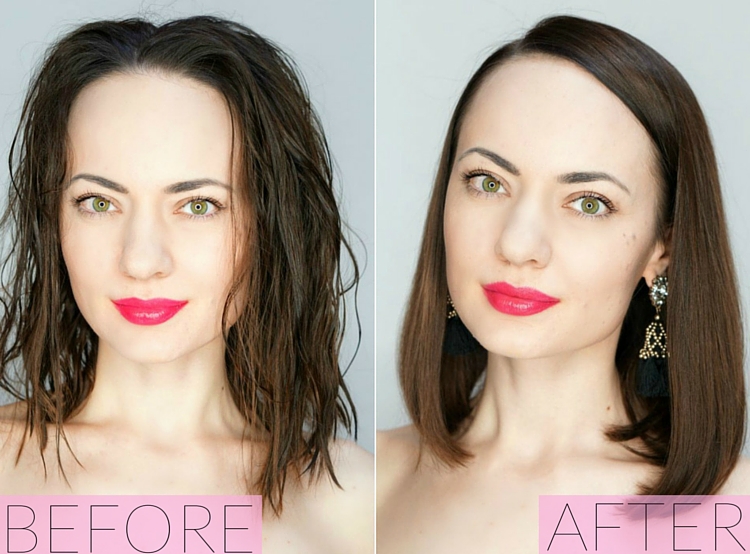
It takes some time and effort to learn how to blow-out your hair the right way. Even if we are talking about hairstyles for straight hair like mine. But no worries at all! In this step-by-step hair tutorial, I explain in detail what is a perfect blowout and how to achieve a professional level blowout in the comfort of your home.
Step 1: Wash & Dry
Right after showering, I wrap my hair in a towel so it’s out of the way while I apply a body oil, serum, and moisturizer.
Then, I leave the towel on for a few minutes while I apply makeup. That way, with no hair getting in the way, it’s easier to work on applying foundation and contouring.

Step 2: Paper Towel
I use a piece of paper towel to remove excess moisture.
One of the biggest mistakes I made when I was less experienced with at-home styling was to start blow-drying sopping wet hair.
These days, I prefer to have my hair 60-to-70 percent dry as this makes blow-drying less damaging and much easier.

Step 3: Diffuser
I used to skip this step but now I’m the biggest fan of using a hair diffuser to add volume to the roots.
I prefer having a hairdryer set on medium heat and low speed while using a diffuser.
Usually, it takes just a few minutes to complete this step and trust me—you don’t want to skip it.

Step 4: Brush
You probably noticed that until this step I haven’t brushed my hair yet.
That’s right: to avoid ruining my hair, I leave this step until my hair is 60-to-70 percent dry.
Then, I splash a bit of heat protectant in my hair or use a blow-dry spray and then brush my hair using a paddle brush.
Separate the top part of your hair and secure it on your crown with a hair clip.

Step 5: Change the Nozzle
Change the nozzle on your hairdryer to a flat one (hairstylists call these concentrators). This nozzle helps to direct airflow so you can achieve a sleek, straight hairstyle.
Usually, I put my hairdryer on medium speed and high heat while straightening my hair.

Step 6: Change the Brush
Using a rounded brush, start wrapping the hair around it and blasting it with heat.
The most important thing here is to start brushing from the roots (not from the ends!) and then move toward the ends.
By doing so, you are adding extra volume and cutting the time required for completely drying each strand of hair.

Step 7: Hair Pin
Using a hairpin, part your hair the way you usually wear it.
You can also use a hair comb, but I prefer a pin as it provides more precise results.

Step 8: Finishing Spray
Use a finishing spray of your choice (I use amika Un.Done Texture Spray).
I prefer texturizing spray to a regular hair spray as it adds additional volume and provides an invisible, undone hold that looks so effortless and natural.
I hope you enjoyed my step-by-step tutorial and learned something new about taking care of fine, frizzy, and unruly hair.
Please let me know in the comment area below if you have any questions about any of the tips mentioned in this post. Also, feel free to share your favorite blowout tips and tricks!


This is very helpfull
I really hope this technique works for you, Kerry! Please keep me posted on how it goes! xoxo
Thank you so much for reading, Wynne! I really appreciate your kind words and a feedback!!! Have a lovely day!! xoxox
I love this and will try it next time I blow dry. I have very straight and fine hair.
http://www.fabulousindeed.com
Ohhh thank you!
I feel your pain, girl! My hair used to be super freezy too (now it’s just regular freezy lol), but ever since I started using hair oils the situation got better. Usually, I apply a lot of argan oil the night before I need to wash my hair (or before a workout) and there is less freeze on my hair in the morning. Perhaps, give that strategy a try?
Also, professional hair care tools are a must-have. Yes, these are usually expensive but it’s an investment in future good looks!
Thank you for stopping by and for your sweet compliments, dear Hannah! Have a wonderful evening! Xoxo
It works. Your hair is beautiful.
this is such a well written and illustrated how-to, great job! thanks for the tips, sure it comes in handy for most women reading your blog here including yours truly. :)
Great post, love the photos and the clear step by step instructions. My hairs just frizzy so unfortunately, unless I wanna spend hours using the hairdryer to staighten my hair, my daily use are my GHD’s. Your hair looks great by the way.
Love Hannah xx
http://www.HannahHawes.com
It took me forever to learn, but once you have great styling tools the process is much easier! Thank you for stopping by, Allison!
Thank you for your comment, Rosanna! Have a wonderful weekend too!
Thank you, Natasha! I recently changed by hair color to brunette and my hair started looking much better. Also, these days I am all about Argan Oil treatments – it’s a very good treatment that I recommend to everyone. I hope it helps!
Your hair looks so healthy!
Amazing tips, I never blow dry my hair properly, I must try!!
Have a lovely weekend :)
Rosanna x
http://rosesrooftop.blogspot.co.uk/
Thank you!
Great tips!
I’m so awful at blowdrying my hair! I need to try these tips out!
http://www.girlnextscore.com