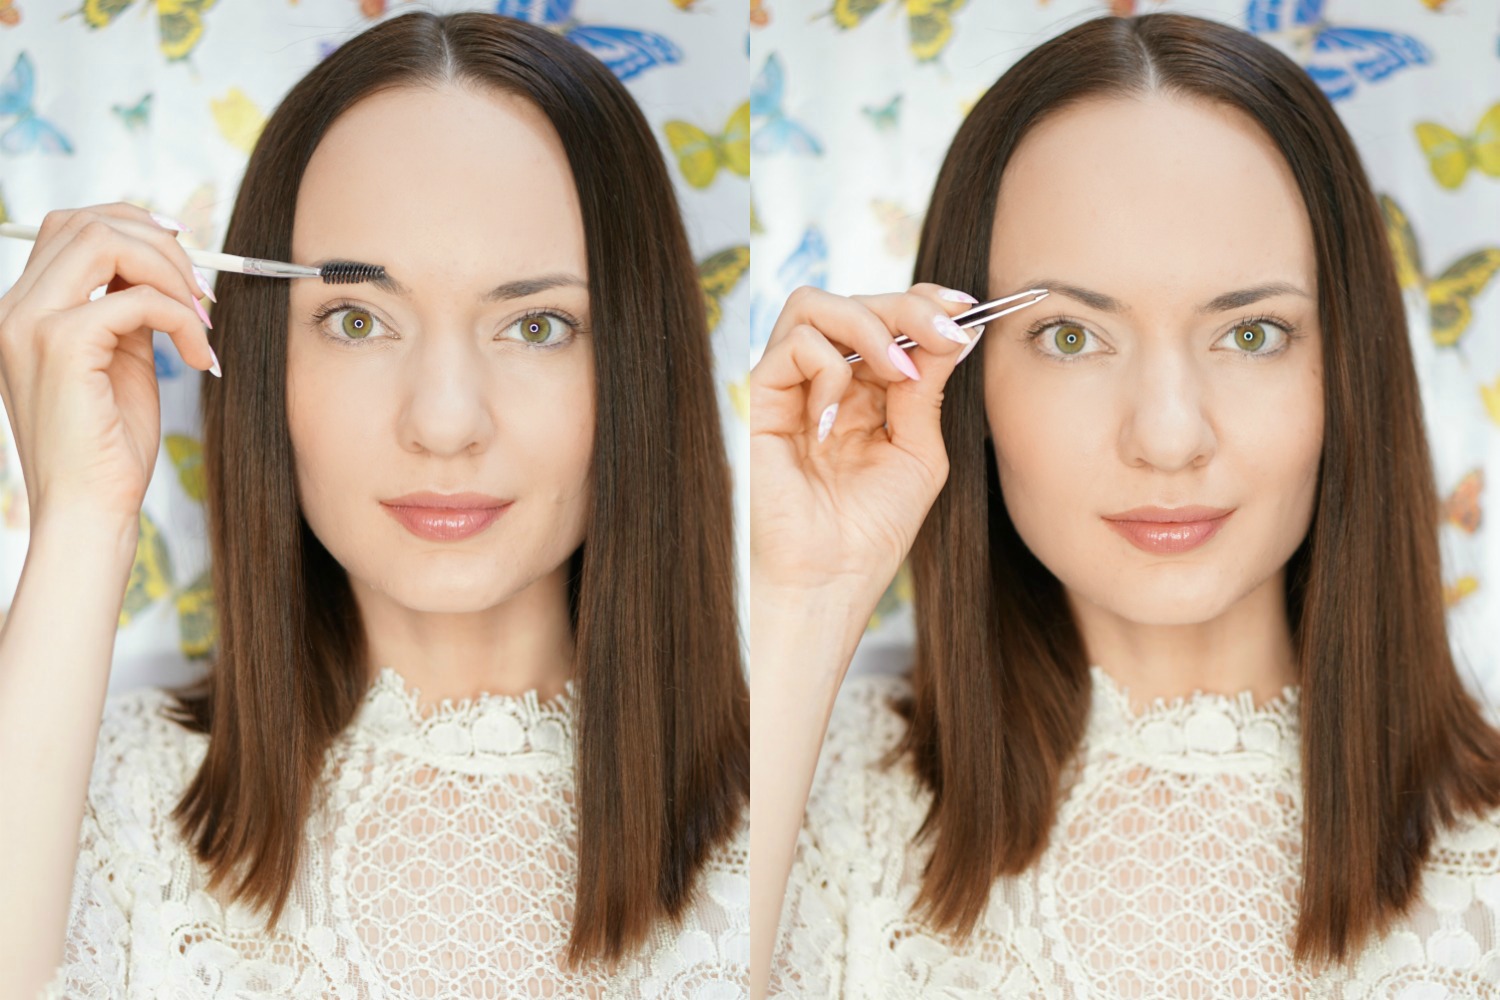
You don’t need to be a pro to learn how to shape eyebrows at home. With the help of a few essentials, you can achieve the perfect brows look in the comfort of your home. Get your tweezers ready!
A lot of you guys asked about my eyebrow routine. I did share one of my brow filling tips a while ago, but it’s just one of the tricks I’m using. This time around, I’m sharing with you my complete eyebrow routine. From plucking to makeup tricks that I use to make my brows look more groomed and full.
Eyebrows Plucking & Shaping
If you remember my rant on how waxing caused major breakouts on my face, I stopped trusting any other techniques except plucking my brows with tweezers.
Even though it requires almost daily maintenance, I feel that plucking one of the most reliable, hygienic, and affordable methods of keeping your eyebrows in good shape.

Step 1: Brush
I always start with brushing my eyebrows with a flat, angled brush. I’m wearing brow makeup every day. So for me, it’s important to brush my brows in the exact way I’m styling them with makeup products.
Step 2: Plucking
Usually, I’m using a lighted magnifying mirror to pluck my brows. That way, I see every single hair that might not get noticed if I was threading or waxing my brows.
It took me a few months to get my brows in the desired shape after I stopped waxing them. But now I’m completely satisfied with the result. I have an entire collection of tweezers that I use according to that day’s mood.

Step 3: Eyebrows Shaving
I guess I’m completely OCD about my brows, but after tweezing, I always follow up with an eyebrow razor. What this tool does is eliminating any tiny, almost invisible hair that I am not able to catch with tweezers. It’s also perfect for making the upper line of eyebrows more even.
Don’t overdo it with a shaver though! I had a few accidents when I went way too far with shaping my brows and it took forever to grow my brows back.
Step 4: Trimming
I also make sure to always trim my brows, especially near the inner corner of the eye. In that area, my brows are getting particularly wild! I use scissors and the same brush I mentioned in step one.
First, I brush all hair up and then gently trim the ends. Then, I brush my hair away from the nose and trim a bit the bottom line of the brow.
Eyebrows Makeup
Recently, I changed my eyebrow makeup strategy and started using brown shades instead of black ones. I also introduced two new products into my routine, soft wax and setting powder. Those additions work perfectly in the summer when my regular brow pencils and gels melt from humidity.

Step 1: Brow Pomade
I started using this product just recently, but it completely changed my eyebrow game. I used to begin my routine with a brow pencil and finish with an eyebrow gel.
However, I noticed that the pigment stays in my brows longer if I define them with soft wax or a brow pomade first.
If I’m at home, I usually pick my favorite angled brush to apply the product with long, smooth strokes. When I’m on the go, I use a mini brush that comes with the brow kit.
Step 2: Brow Pencil
As I mentioned before, the era of black brows is over for me. Those days, I’m all about brown eyebrow pencils as those help to create a more natural look.
Using the same angled brush, I pick a tiny amount of color from the pencil and paint my eyebrow line, starting from the bottom and then painting the top line.
I use very soft strokes in between eyes area (as I will apply powder on that area later on), and stronger strokes on the arch of my brow.

How to Find the Lines for Shaping Your Brows
PRO TIP: While painting your brows, keep in mind the following pro hacks:
- The start of your brow should be aligned with the top point of your nostril.
- The highest point of your arch should be aligned on a diagonal with your pupil and the nostril.
- The end of your brow should end on a diagonal from the nostril.

Step 3: Powder
In my experience, filling in the brow with a pencil in inner corners never looks natural. Instead, I prefer using brow powder in that area. I apply a tiny amount of powder on the inner corner of the brow and distribute the product’s leftovers towards the end of the brow.
Step 4: Brow Gel
Even though I already applied the soft wax, it’s important to finish the look with a brow gel that keeps every single hair in place.
My absolute favorite brow gel is Anastasia Beverly Hills Brow Gel. But this time around, I used an affordable alternative by e.l.f. that also works very well for me.

Step 5: Concealer
The trick to creating a perfectly sharp brow line is to apply two different shades of concealer below and above the brow. Apply a shade that is lighter than your foundation on the bottom line of the brow and a color that matches your foundation shade on top of the brow.
Bottom: Usually, I apply the product directly from the tube and use a flat concealer brush to evenly distribute the product. My favorite under brow concealer at the moment is NYX HD Photo Concealer Wand in Porcelain.
Top: In that area, I prefer using a ProPencil by Anastasia Beverly Hills in #Base 1. Usually, I paint a line just a millimeter above the top line of the brow and dab it with my fingertips until the product absorbs into my skin.

Step 6: Highlighter
A little shimmer underneath the brow opens up eyes and makes the face look more “awake.” Saying so, I love applying a tiny amount of a highlighter under my brow bone. And add just a tiny amount of the same product onto the inner corner of my eye to make my look more unified.
I hope you enjoyed my eyebrow tips and tricks. Please let me know if you are using any of those. Also, don’t forget to share your tips on how to shape eyebrows with the Style Sprinter community!


I use the same gel, gorgeous as usual Katya!
xx
Lauren
http://www.shoesandsashimi.com
Such a classic European look! Nice.
MarinaSays
So. On. Fleek.
(Do people still say that? lol)
Thanks so so much for sharing! I have been doing my very best to up my brow game and this post is insanely helpful, hon <3 The only thing I am missing is the highlighter – really need to check out that Seventeen one!
xox Nadia
http://www.mielandmint.com
I love this! There is something fun about a sneaky look into someone’s makeup!
http://www.lipstickisalife.com
Absolutely love this post! How you do look so put together in such awkward positions!! Haha :-)
http://makemeupmarie.com/
xoxo
your brows are on point babe! thanks for the tutorial!
http://www.samanthamariko.com
Did I forget to mention that you are so pretty ^_^
You have done it beautifully! I always face hard time for my eyebrows because my brow hair growth is very fast. So after every 2 to 3 days, I need a touch up!
http://www.salmashaheensblog.com
Your routine Definitely works, babe!! You look beautiful!
Adi xx
http://www.fancycorrectitude.com
http://www.instagram.com/fancycorrectitude
You’re so pretty Katya! Thank you for sharing this tutorial! :)
http://www.simimaus.blogspot.com
You have amazing eyebrows, I really need to follow these tips.
http://ohduckydarling.com
Your eyebrows are *literally* perfect. Thanks for sharing!! Pinning to my beauty board :)
Xx, K
http://www.jassamineelaine.com
I never know how to tweeze and shape my brows so I always had it done. I haven’t had it done for ages though because it took me forever to grow it back after a threading session went wrong.
Shireen | Reflection of Sanity
Great post! I also use the Seventeen Brow’s That kit, it’s brilliant! Your brows are seriously on point! xo
http://rachelnicole.co.uk/
Thank you for reading, Rach!
Awww thank you so much! Yes, trimming is a must!
Thank you so much, Maria! Let’s organize a master-class for you! ;)) I do love your brows though! You are so beautiful, you don’t need any makeup at all!
Thank you for reading, Steph! Have a lovely day! xoxox
Thank you so much, Amy Ann! I truly appreciate you stopping by!! Have a lovely day!
You are very welcome, dear Shauna! And thank you! I really appreciate your support!
Thank you so much, sweet Lacey! I really appreciate the compliment! Have a lovely day! xoxo
Awwww thank you so much, Jalisa, for your sweet comment!
Honestly, it took me SO long to figure out how to do my brows in a way that I truly like. I went everywhere from having too thin to too bushy brows. I’m so glad that my current situation is somewhere in between!
It takes a bit more products to keep my brows in shape that I expected, but I do not complain ;)) In fact, I enjoy wearing makeup and especially eyebrow makeup!
Have a lovely day and a wonderful week too!
xoxo
You are such a beauty, girlie, and I love your brows! Defining the brows correctly in a way that flatters our face shapes are so important, it can be such a difference! Thanks so much for sharing your routine with us, it’s no wonder you have such amazing brows! I hope you have a great week ahead!
XO,
Jalisa
http://www.thestylecontour.com
Your eyebrows look AMAZING! Can’t wait to try these tips!
xo Lacey
http://www.myboringcloset.com
You look just gorgeous! Thanks for these tips too!
Shauna
http://www.lipglossandlace.net
Your brows are amazing! And this is one of the best posts about them I have seen. I always pluck and trim mine then fill them in. I need to try wax.
Amy Ann
Straight A Style
Your eyebrows look amazing! Thanks for the tips!
xO – Steph
http://www.urbanblonde.com
You’re so good with this, I can’t ever make it right, too dark for my skills.
XO,
Maria
MariaOnPoint http://mariaonpoint.com/ | Find me on IG https://www.instagram.com/mariajabad/
Your eyebrows looks lovely! Always trim the brows too to get a better shape! Xx
http://www.thefashionfolks.com
Thanks for the thorough routine. This is so helpful! Your eyebrows look reallygood!
http://www.rdsobsessions.com